How To Make a Charcuterie Board
In case you missed our live demo, check out our tips and recipes for making a charcuterie board!
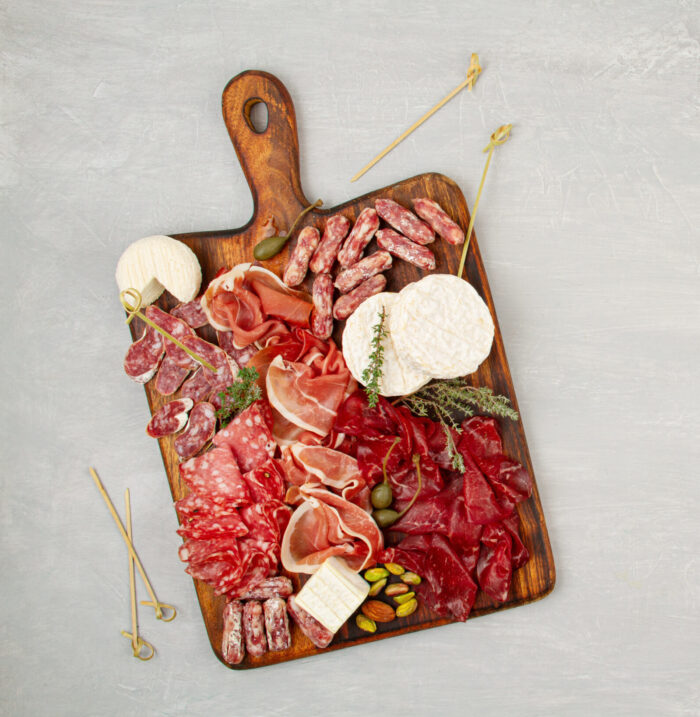
Creating the perfect Charcuterie Board can be overwhelming, and oftentimes, it’s hard to find a place to start. BUT WE’VE GOT YOU COVERED! Here are a few of our tips and tricks for building a beautiful charcuterie board like the one pictured above. Feeds 4 people.
Before we get started: Building a charcuterie board should be fun! It is important to remember that the ingredients and recipes listed here are only suggestions, and it is always acceptable to make it your own. Build your board based on what ingredients are available to you, and your own personal preferences! Now let’s get started!
First, you will need to find something to build your board on. Many like to use pieces of wood like the one pictured above, but you can always use a basic plate or any dish of your liking. Once you have chosen your material, we will first start with building the base of our board:
Ingredients (NC State inspired of course):
- 2oz each of 4 cured types of meat or plant PACKed alternatives
- 2oz each of 3 kinds of cheese OR 2oz Howling Cow salted butter
- 2 softened pitas OR 1 small pack of crackers
- ¼ cup dried fruit
Feeling adventurous enough to make your own pita crisps? We’ve got the recipe to help!
Ingredients:
- 1-Package of Pitas
- 1-Tablespoon Olive Oil
- Salt to Taste
Instructions:
- Cut each pita into 6-8 wedges
- Toss with oil and salt
- Bake at 350F until toasted
Now that we’ve gathered our ingredients, it’s time to start building our board. First, make sure your meats and cheeses are sliced into your desired sizes. Next we will build. The easiest way to do this is by starting in the middle, and working your way outwards. It is often suggested for “aesthetics” to categorize your ingredients based on color, keeping all of the same food together, but you can arrange it however you like. Below is an image for reference:
Now that we have established a base to our charcuterie board, it is time to add in a little flavor and variety. How do you do this you might ask? Here at NC State, we like to do it with delicious dips and spreads! Below are two amazing recipes from our NC State chefs to add a little umph to our charcuterie boards. (P.S. both recipes are Plant PACKed alternatives!!!)
The first is a recipe for a Tapenade Spread!
Ingredients:
- 1-teaspoon chopped garlic
- 1-cup pitted kalamata olives
- 2-tablespoons parsley
- 2-tablespoons lemon juice
- 2-tablespoons olive oil
- Salt & Pepper to taste
Instructions:
- Place garlic, olives, capers, parsley, lemon juice and olive oil in a food processor
- Blend until finely chopped
- Season with salt and pepper to taste
Our second recipe is for Brownie Batter Hummus!
Ingredients
- 1-cup chickpeas (retain some of the bean liquid)
- 1 ½-teaspoons vanilla extract
- ¾-teaspoons cocoa powder
- ¼-cup semi-sweet chocolate chips
- ¼-teaspoon salt
- ¼-cup coconut milk
Instructions
- Combine chickpeas, vanilla, cocoa powder, chocolate chips, honey, and salt in a blender
- Pulse to begin combining
- Gradually add coconut milk
- If the mixture is too thick, add retained chickpea liquid or water as needed until desired texture is achieved
PRO-TIP: When adding dips and spreads to your board, it is often suggested to find a small bowl or dipping dish and place it on the board. This way, it is easy to access, and adds in a little variety to the look of the board.
Another tip for adding some life to your charcuterie board is to garnish it with some herbs! Some suggestions for herbs you could add include rosemary, thyme, basil, but remember, you can always make it your own, and add whatever you like. Herbs such as these are a great addition to foods not only because they add to the “aesthetically pleasing” look, but they are also aromatic, so they actually stimulate our appetites! Herbs also have many health benefits, as they may help to reduce blood clots, and provide anti-inflammatory and anti-tumor properties. You can’t go wrong when incorporating these into your board!
Think we’re done? Not quite! We have one final bonus recipe to help add a little flavor to your board! MUSHROOM “BACON,” another Plant PACKed Alternative!
Ingredients:
- 8 oz-mushrooms (shiitake is recommended)
- 2 Tbsp-canola or olive oil
- 1tsp-salt
- Optional: For a smoky flavor, add ⅓ tsp smoked paprika, smoked salt, or onion powder
Instructions:
- In a large skillet, heat olive oil on high.
- When it starts to ripple, layer in the mushroom slices and sprinkle with the salt and half of the pepper.
- Sear for as long as possible, letting them brown and get a little crispy (about 5 to 6 minutes)
- When crispy, remove from the skillet and transfer to a paper towel.
Now, when our Mushroom “Bacon” has cooled down, we can add it to our charcuterie board for a final touch!
FINALLY! We are finished and can enjoy our board! Remember, when making a charcuterie board, there is no right or wrong way, only your way! Along with this, take note that these recipes are only suggestions. You can always get creative with your ingredients and build your board according to what you have on hand! It is important to have fun with it, and always make it your own! Happy building!
Written by Morgan Robinson, Dining Diplomat and Junior Nutrition Science Major